Installing an aftermarket exhaust is a simple and relatively inexpensive way to personalize your bike. Granted the job may look a little daunting, especially if your only prior mechanical experience in that direction involved dropping the car off at the local Midas Muffler shop, but in fact, it's neither a difficult nor involved procedure and requires little in the way of tools or mechanical experience, which makes it a great do-it-yourself project, here's the skinny.
Just In Case
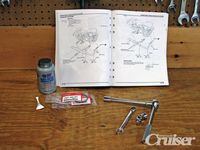
Start by reviewing the appropriate section of your service manual, the one entitled, _"Removing the Exhaust." _Among other things, it'll point out exactly what you need to remove, and in what order, along with a list of tools you'll need to do the removing. The last one is kind of a biggie. If the job requires a 13 mm swivel-joint socket and you don't have one, it's not much of a problem. They're common as dirt and not too expensive, so acquiring one shouldn't present any particular problems. On the other hand, finding out halfway through the project that a particular bolt isn't coming off without the help of a torch, which will work, but no doubt create other issues, or that missing socket, it's another story. Trust me on this; if that's the case then every shop that carries 13 mm swivel-joint sockets will be closed, out of stock or 100 miles away, as they say, forewarned is forearmed.
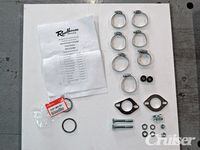
Likewise, before removing a single bolt from the exhaust you're replacing, unpack the new system and make sure that (A) it's the correct system for your application, you wouldn't be the first guy to get the wrong pipe, in fact the first one sent for this install turned out to be wrong, and (B) that everything you need to fit the system is actually there. Compare each part to the supplied parts list, and make sure any recommended extras, in particular new exhaust port gaskets (if required) are on hand before you commence to wrench.
As a side issue, I've spoken to more than one guy that doesn't replace the exhaust port gaskets unless he absolutely has to, and yes, some of these guys work in motorcycle shops. The problem is that exhaust port gaskets are for the most part "crush" gaskets, similar in design to the crush washer used on an oil drain plug or sparkplug. Can you reuse them? Well, yeah, you can sometimes do that, especially if the bike is relatively new, but in the main, it's not a great idea. A leaking exhaust port gasket will create a backfire on deceleration, and makes a mess of the cylinder head/exhaust port area. Exhaust gaskets are cheap, and since I'm not a gambling man, my inclination is to always replace them. If you don't think it's necessary, by all means, reuse the old ones, but don't say I didn't warn you if the head pipe starts to leak.
Off With The Old
When I was a flat rate mechanic I saw lot's of guys remove a few crucial bolts, give a manly yank, accompanied by a few choice invectives, and be rewarded for their efforts with a large chunk, or sometimes the whole of the exhaust dropping to the bench like a pole-axed mule. When you're being paid by the job every second counts, but sometimes it's better to act in kinder, gentler manner, especially when you want to avoid damaging the old exhaust or the bikes finish.
Under most circumstances, you should break down and remove the individual exhaust systems components one at a time, typically by starting at the rear and working your way forward. Removing the exhaust in bits and pieces can be time consuming, especially if road dirt and carbon have conspired to prevent things from coming apart but with a little WD-40 and some elbow grease the parts will soon separate, and the individual parts will be a lot easier to handle by yourself than one huge chunk of awkward to balance exhaust.
However, there's always an exception to the rule and here's where it pays to read through the manual. Honda, in their infinite wisdom recommends removing the VTX1300 pipe in one large chunk. This was at odds with the pipe builders supplied instructions, but it did save time and effort, proving that even an old dog like me needs to read the manual from time to time.
Whatever method you use is of little consequence but take the time to lay a little groundwork beforehand. As a rule, motorcycle exhausts are normally in much better shape than the rust factories found on your family grocery getter, so corroded, crusty parts and hardware aren't normally an issue. Regardless, it pays to give all the exposed hardware a good dousing in WD-40, Liquid Wrench or some other rust-busting aerosol at least a day or two before you plan to remove the exhaust. A good, penetrating oil will make the job go a lot smoother and reduce the chance some recalcitrant nut or bolt will seize solid and make the job more challenging than it has to be.
Once the old exhaust has been removed, bag up all the OEM hardware, label it and put the exhaust and the hardware safely aside. Resist the temptation to toss it out or sell it on E-bay. Many states are enacting muffler sound and emission laws, or in some cases, simply mandating that your motorcycles muffler(s) have an OEM exhaust certification stamp, so down the road you may want to reinstall that stock system if only to avoid certain legal hassles. It'll also sweeten the deal with a potential buyer should you decide sell the bike at some future date.
On With The New
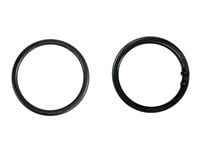
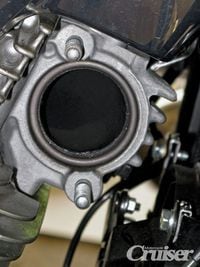
With the old system tagged, bagged and out of the way it's time to install that bright and shiny new pipe. Start by replacing or at least inspecting the exhaust port gaskets, if you're going to reuse them, (again, not recommended,) make sure they're still serviceable, look for nicks, gouges or serious deformity, if there's any doubt, replace them. While you're in there it won't hurt to give the exhaust port a little attention. Built up carbon can prevent the new pipe from seating properly and make it more difficult to install. A quick swipe with a hunk of sandpaper should clean things nicely. If your engine uses exhaust port studs, now's the time to make sure they're snug. Your manual may have an installed height specification for the stud, but in most cases tight is fine, but remember too tight is broken so don't be overzealous when you're applying the wrench. If everything is to your liking, install the exhaust port gaskets, if need be with a dab of grease, to prevent them from dropping out.
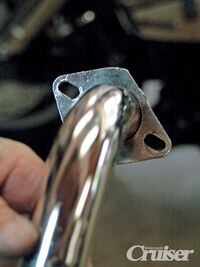
Typically, the head pipe will held in place with a collar or flange. If the flange isn't already on the pipe select the correct one, some flanges are asymmetrical, the pipe builder's instructions should provide clear details and slide the pipe into the port. A light coat of anti-seize applied to the pipe will help it glide home and make it easier to remove, should it ever come to that. It'll also make it easier to adjust the pipe so you can get a perfect fit. Snug but don't fully tighten the head pipe, you'll probably being doing some adjusting before you're done.
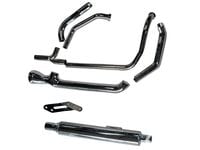
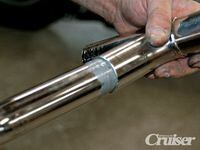
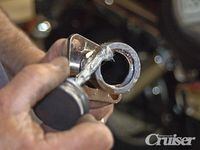
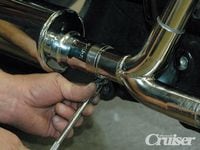
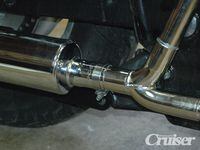
Normally the first head pipe will be followed by the second, and so on, but in some circumstances, you may need to install a bracket or collector before proceeding, look to the instructions for the specifics. For example the Roadhouse Classic pipe we're installing on the VTX, uses a two into one collector system so there's a Y pipe that must be in place before the rear cylinder's head pipe can be inserted. Again a dab of anti-seize will speed things along and prevent the pipes from binding should you need to adjust them. Snug the clamps, but don't fully tighten them just yet, a little slack in the system will make it easier to fit the remaining parts. Typically, the last step will be to install any mounting brackets and hardware followed by whatever your particular installation requires in the way of a muffler.
Opinions vary on what sequence to use when tightening up the exhaust system. One manual recommends starting at the head pipe and working your way to the muffler, while another wants the process reversed.
I like to start at the head pipe and work my way towards the mufflers, tightening everything in stages. It usually takes me two or sometimes three passes to torque everything down, but doing it this way pulls the joints down evenly and completely which helps prevent any backfiring-induced air leaks and forestalls preloading the system, which might lead to premature component failure.* (see sidebar 2)
With the system firmly secured go ahead and install any heat shields or muffler guards, and replace any ancillary parts, like floorboards, brake levers or side covers that were removed to access the exhaust system. As a final touch wipe down the exhaust with a clean rag and your favorite degreaser, I generally use brake or contact cleaner to remove any greasy paw prints, before giving the pipe a quick coat of chrome polish or wax. After the road test, allow the system to cool off, and then recheck all the hardware, just in case it's gone a little slack after being heat-cycled.
Jetting
Most pipe swaps will require some rejetting or remapping of the fuel system. EPA regulations have forced the manufactures to run their bikes on the ragged edge of lean so in many instances the additional airflow created by installing a less restrictive exhaust system pushes them over the edge. The rule of thumb is; the less restrictive the new exhaust, the more likely it is to require rejetting. This is particularly true if you're making a radical change in the exhaust system design, and be advised; making a very radical change may cost you horsepower and torque, at least at some point of the power band, no matter how carefully the bike is jetted. My suggestion here is to use the pipe manufacturer's baseline recommendations as a starting point and see how the bike runs. In most cases, it'll be pretty close to what you'll need, and all it should take to make it perfect is a little fine-tuning. If things seem really wrong, double check the jetting or fuel management module installation and settings. If they're on the nose and the bike still won't run, book some dyno time. You'll learn more in three quick pulls in the dyno than you would during a weekend of riding up and down the street in front of your house, and your neighbors will stay a lot happier.
Bluing
Most aftermarket pipes will blue, at least for some of their length, and the simple fact that they do isn't necessarily a cause for concern. Here's why; with some exceptions, the majority of aftermarket pipes are built from single wall tubing and then chrome plated. As soon as heat passes through them, they turn blue and frankly, there's not much you can do about it. Some things, for instance overly rich or lean jetting, letting the bike idle for extended periods, especially with the choke on (or anything else that causes the bike to run hot) exacerbate the situation, but even if everything is perfect, chances are good that some portion of the pipe is going to discolor.
Back in the day some guys (and I mean that in the generic sense) would spray the inside of the pipe with heat resistant paint, or even coat the inner surface with grease. It really didn't do much except postpone the inevitable. If a blue pipe is a deal breaker for you, I'd suggest you look towards some of aftermarket pipe builders that use double wall construction.
Why A Roadhouse Two Into One?
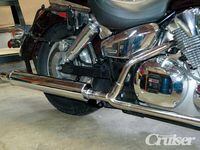
I'm a big fan of the Roadhouse Two into One Classic exhausts. They have the look I want, aren't much louder than a stock system, but have a deeper, richer tone and are well constructed. Additionally, they're easy to install, and provide much needed room for larger saddlebags. Due to a communications misfire they arrived a little late, I barely had time to get them on the bike before this issue went to press so look for a full review on them in the next issue.
Dude My New Pipe Just Fell Off!
A heavily preloaded exhaust system is guaranteed to fail, and it usually happens in a lot less time than it took to install the system.
Preloading occurs when rigid parts are forced into position against an opposing tension. For instance, when an exhaust pipe doesn't quite line up with its mounting bracket it's usually possible to force it into place because the pipe is essentially a long flexible piece of tubing. The problem is that heavily preloaded parts are highly susceptible to vibration-induced damage. It's far better to fiddle and jiggle until everything lines up nicely, or shim the mounting bracket with a few strategically placed washers than it is to force the pipe into place with brute strength, and hold it there against its natural inclination with a nut and bolt. Against my better judgment, I once installed a brand new race bike pipe to gain some extra ground clearance I forced the pipe on to a shortened bracket, which preloaded the snot out of it. Before I hit the third turn, the pipe bracket had fractured and my new pipe was dragging on the ground... so much for the extra ground clearance! An extra five minutes spent properly aligning the system would have prevented my $200.00 pipe (this was a long time ago) from breaking after less than a minute of use, so let that be a word to the wise.
/cloudfront-us-east-1.images.arcpublishing.com/octane/URZBW5LIV5BIXMBTOKHIDHMIPM.jpg)

/cloudfront-us-east-1.images.arcpublishing.com/octane/6KKT5NNL2JAVBOXMZYS5ZO76YA.jpg)
/cloudfront-us-east-1.images.arcpublishing.com/octane/H6Z2IC7WYRBXZNQS4MI3SZ5KPQ.jpg)
/cloudfront-us-east-1.images.arcpublishing.com/octane/IWO5T5PBT5E4HFQ5GK47H5YXR4.jpg)
/cloudfront-us-east-1.images.arcpublishing.com/octane/OQVCJOABCFC5NBEF2KIGRCV3XA.jpg)
/cloudfront-us-east-1.images.arcpublishing.com/octane/F3O2DGLA4ZBDJGNVV6T2IUTWK4.jpg)
/cloudfront-us-east-1.images.arcpublishing.com/octane/ZXYQE3MHLFDSPKNGWL7ER5WJ4U.jpg)
/cloudfront-us-east-1.images.arcpublishing.com/octane/RDF24VM7WVCOBPIR3V3R4KS63U.jpg)
/cloudfront-us-east-1.images.arcpublishing.com/octane/W7RSIBFISNHJLIJESSWTEBTZRQ.jpg)
/cloudfront-us-east-1.images.arcpublishing.com/octane/AERA26ENRNBW3K324YWCPEXYKM.jpg)
/cloudfront-us-east-1.images.arcpublishing.com/octane/YWX3YX7QBBHFXFDMEEEKRG4XJE.jpg)
/cloudfront-us-east-1.images.arcpublishing.com/octane/I7OKI53SZNDOBD2QPXV5VW4AR4.jpg)
/cloudfront-us-east-1.images.arcpublishing.com/octane/IH52EK3ZYZEDRD3HI3QAYOQOQY.jpg)
/cloudfront-us-east-1.images.arcpublishing.com/octane/K2FSAN7OWNAXRJBY32DMVINA44.jpg)
/cloudfront-us-east-1.images.arcpublishing.com/octane/G4XK7JL24FCUTKLZWUFVXOSOGE.jpg)
/cloudfront-us-east-1.images.arcpublishing.com/octane/JJNXVAC27ZCDDCMTHTQZTHO55Y.jpg)